
Setting Up A Data Science Environment on OSX
Original Inspiration For This Guide
Here is a general overview of the basic tools you will probably need to familiarize yourself with:
- XCode
- Homebrew
- Homebrew Cask
- Git
- Vim
- Atom
- Python (with Anaconda)
- R (with RStudio)
- LaTeX
This guide is written with OSX in mind, but works almost exactly the same on any given Linux machine. If you are a Windows user then you are probably going to have to navigate to each of these sites, download an install file and follow the GUI installation. With that said you can skip large parts of this article as they don’t pertain to Windows users. The following is what you should try to install:
- Git
- Vim
- Atom
- Python (with Anaconda)
- R (with RStudio)
There is a Homebrew equivalent for windows, that I have only heard about recently called chocolatey. I have never used this, but it appears to operate similarly to Homebrew.
XCODE
Xcode is an integrated development environment (IDE) for macOS containing a suite of software development tools developed by Apple for developing software for macOS, iOS, iPadOS, watchOS, and tvOS. To install Apple’s command line tools, open your Terminal app or whatever terminal emulator you use and enter:
xcode-select --install
Why Do I Need It?
When you download a package from a package manager such as Homebrew it comes as source code, the package manager looks for a build environment to turn it into a binary application file, and Mac package managers, for obvious reasons, use the tools provided by Xcode. As it happens, Xcode is a rather complex and intimidating program, but the package manager takes care of all the details. This means you don’t have to interact with Xcode to manage packages other than to download and install it according to the package manager’s directions. To simplify package management further let me introduce you to…
HOMEBREW
Homebrew is a free and open-source software package management system that simplifies the installation of software on Apple’s macOS operating system and Linux. The name is intended to suggest the idea of building software on the Mac depending on the user’s taste. If ruby is installed in your path (it should be) then it can be installed by running the following:
$(which ruby) -e "$(curl -fsSL https://raw.githubusercontent.com/Homebrew/install/master/install)"
Follow the command line prompts and enter your User password when instructed. By default, Homebrew will be installed such that we can use the brew command without having to type sudo and providing a password.
To make sure we have the latest Homebrew version and the latest formulas (which we should), we can run:
brew update && brew upgrade
Features, usage and installation instructions are summarised on the homepage. Terminology (e.g. the difference between a Cellar, Tap, Cask and so forth) is explained here.
Now we are ready to install some software!
HOMEBREW CASK
Homebrew Cask extends Homebrew and brings its elegance, simplicity, and speed to the installation and management of GUI macOS applications such as Atom and Google Chrome.
This is done by providing a friendly CLI workflow for the administration of macOS applications distributed as binaries.
brew install cask
Features and usage instructions are summarised on the github.
Since macOS Catalina you may be prevented from opening apps from unidentified developers. A full explanation can be found here, but if you see something like…

You can fix this by running:
sudo spctl --master-disable
GIT
If you’re a new developer, you should’ve learned Git yesterday. Git is a fast, scalable, distributed revision control system with an unusually rich command set that provides both high-level operations and full access to internals. Git simplifies the process of working with other people and makes it easy to collaborate on projects. Team members can work on files and easily merge their changes in with the master branch of the project. This allows multiple people to work on the same files at the same time. Git is most likely already installed, but you can check by running:
git --version
If not then:
brew install git
VIM
Vim is a highly configurable text editor built to make creating and changing any kind of text very efficient. It is already included with Apple OS X but we will make sure we have the most recent version installed and configure the editor to our tastes.
To install the latest version, use Homebrew with the following commands:
brew install vim
brew link vim
Now we should have the most recent version of Vim installed (if you would like to check, type vim —-version).
ATOM

Atom is a free and open-source text and source code editor for macOS, Linux, and Microsoft Windows with support for plug-ins written in Node.js, and embedded Git Control, developed by GitHub. Atom is a desktop application built using web technologies. Most of the extending packages have free software licenses and are community-built and maintained, and it can also be used as an integrated development environment (IDE) with conda managed environments. Its developers call it a “hackable text editor for the 21st Century”.
brew cask install atom
There are any great source code editors, but I like Atom for all the reasons mentioned here and then some.
Again you may have to override the Apple setting that prevents opening apps from unidentified third party developers.
PYTHON
When you’re first learning a new programming language, a lot of your time and effort go into understanding the syntax, code style, and built-in tooling. This is just as true for Python as it is for any other language. Once you gain enough familiarity to be comfortable with the ins and outs of Python, you can start to invest time into building a Python environment that will foster your productivity. There are many great ways to do this (most of which are explained here). But, I will save you the trouble and recommend you use conda environments while developing.
INSTALL ANACONDA
Anaconda is probably the most popular distribution for Data Science since it abstracts away many of the complexities associated with package management, helps keep dependencies updated, and comes with many useful Python tools such as Jupyter Notebooks.
Determine whether you are going to install with the anaconda GUI or from Terminal.
-
Install with GUI:
The easiest way to install the distribution is through the graphical installer.
- Go to the Anaconda Website and choose a Python 3.x Graphical Installer (scroll down if you don’t see it).
- If you need to run a program in Python 2, virtual environments allow you to create different versions of Python depending on the project you are working on.
- Locate the download and double click it
- Click through by hitting “Continue” to install with default settings (except for one step, see below) giving your admin password when prompted.
- I choose to not install Microsoft VS Code, a Python IDE that comes with the distribution, because I use Atom. However, you should feel free to if you like to use it.
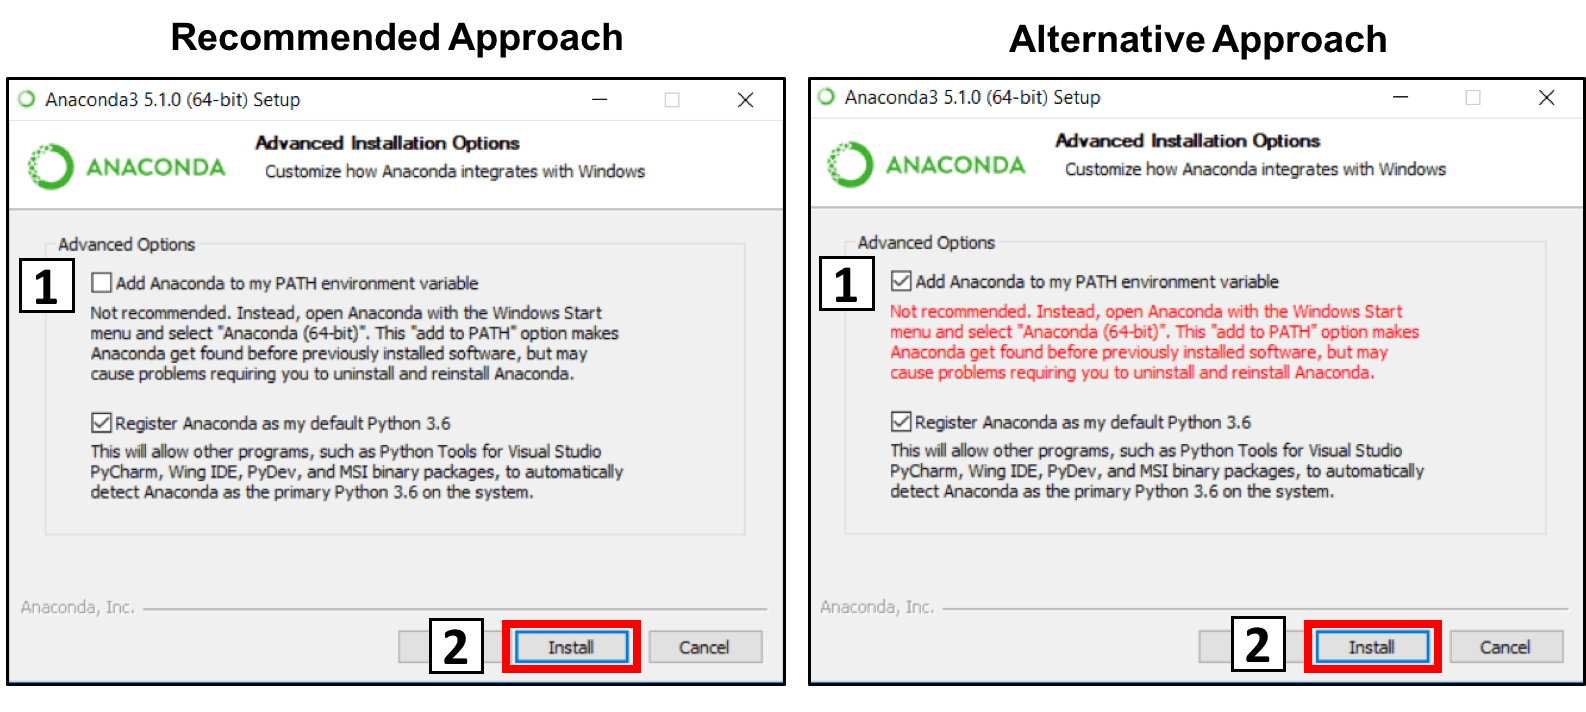
- Note that when you install Anaconda, the program will not automatically update your shell profile with anaconda3 anymore.
To fix this make sure your install prompt looks like the one on the right:
- Go to the Anaconda Website and choose a Python 3.x Graphical Installer (scroll down if you don’t see it).
-
Install from Terminal:
You can also install Anaconda from the command line with the following code:
brew cask install anacondaZSH has been standard since macOS Catalina 10.15 so everything else will be written as if that is the shell you are using. Instructions for bash are abundant and work almost exactly the same. Configure anaconda to be in your path by editing your shell profile. This can be done by running
conda init <SHELL_NAME>where SHELL_NAME in my case is zsh:conda init zshTo see the changes type
atom .zshrcand then you can restart your shell. This will do for now, but just know this is just the bare minimum to setting up Anaconda (more specifically conda) to aid you in deploying data science products. I will be writing a guide on how to use this more effectively in the future. Additionally, I will be writing guides on the difference between zsh and bash as well as how to get the most out of your shell in the future. Sneak Peak Here
TEST YOUR INSTALLATION:
Note that you need to open a new Terminal window for the changes in your environment variables to take effect. Alternatively, you can run:
source ~/.zshrc
Verify you have the correct version of Python installed and that your PATH variable has been updated correctly:
python —version
Your output should look something like:
(base) m-c02xw0cwj1gn:~ t0d00bh$ python --version
Python 3.7.4
Make sure your conda function is working properly and that you are up-to-date:
conda update conda
Another helpful test is to confirm the installation of Jupyter. Run the command jupyter notebook to see if a notebook instance launches. If you have multiple versions of python installed on your computer these tests will not work and you will need to update your shell profile to point to the correct installation of Python. You may have noticed since restarting Terminal that (base) is at the beginning of every line. This is the base environment installed by
R
Technically, RStudio was installed when you installed Anaconda in the previous section, but most people install RStudio alongside R. Almost everyone uses the RStudio IDE and it’s generally considered the easiest and best way to work with R.
INSTALL R AND RSTUDIO
There are several ways to do this but I choose to install using the command line and our newly-minted Homebrew.
brew install r
Update your bash profile with the following command:
echo 'Sys.setlocale(category="LC_ALL", locale = "en_US.UTF-8")' \
>> ~/.zshrc
Now install RStudio:
brew cask install rstudio
INSTALL R PACKAGES & CHANGE THE RSTUDIO ENVIRONMENT
Open RStudio. On the left panel, you should have an R console and terminal. In the console, you can type an R command followed by enter and R will execute the command for you. To install Tidyverse:
install.packages("tidyverse", repos = 'https://cran.us.r-project.org')
You can install a few more useful packages using the syntax install.packages(<package_name>)
Some useful packages are:
- XML : Read and write XML documents with R
- jsonlite: Read and create JSON data tables with R
- httr: A set of useful tools for working with http connections
- rvest : Very useful tool for webscraping
I also like to change the editing colors of RStudio. You can do this by going to
Tools > Global Options > Appearance
I personally like the Idle Fingers theme with Monaco font to reduce eye strain.
To check that everything works, try creating a simple plot in RStudio.
library(ggplot2)
ggplot(airquality, aes(x = Day, y = Ozone)) + geom_point()
What this does is instruct R to use airquality , a pre-loaded dataset, and plot Day versus Ozone.
LATEX
Prepare to set aside a good amount of time (about an hour) to install LaTeX. Since you will have to download a large file, a high-speed internet connection is advisable. LaTeX is a high-quality typesetting system; it includes features designed for the production of technical and scientific documentation. LaTeX is the de facto standard for the communication and publication of scientific documents.
To install LaTeX applications on your Mac:
- Visit http://tug.org/mactex/ and click on the MacTex download link.
- The file is about 3.2 GB so may take a little while (about 20 minutes) to download.
- Once the file has downloaded, double-clink mactex.pkg to begin the installation.
- Read and accept the conditions and follow the on-screen instructions to install. The installation may take a few minutes.
- After the installation is complete, you can delete the mactex.pkg file.
UNIX SHELL and OTHER BREW PACKAGES
At this moment, I have a very particular set up for my Unix Shell environment or dotfiles that I am particularly attached to so I will move on for now. Watch this space as more steps will be added here shortly. In the meantime consider this guide. Also, my main take away was this snazzy way to install multiple apps:
declare -a brew_apps=(
‘htop’
‘wget’
‘speedtest-cli’
)

for app in "${brew_apps[@]}"; do
  brew cask install "$app"
done